什么是 Web3.js - Web3.js 库简介
发布日期:2022/10/4 23:31:37 浏览量:
文章概述
- 1. 什么是 web3.js?
- 2. Web3.js 与 ethers.js。
- 3. 如何在 web3.js 中运行 JavaScript 代码。
- 4. web3.js 是做什么用的?
事不宜迟,让我们深入web3.js的世界;让我们彻底了解它的含义以及如何在我们的智能合约[1]程序中实现它。
什么是 Web3.js?
Web3.js[2]是一个库集合,允许您使用 HTTP、IPC 或 WebSocket 与本地或远程以太坊节点进行交互。
Web3.js允许您开发与区块链交互的网站或客户端。例如,它允许您将以太币从一个账户发送到另一个账户、从智能合约读取和写入数据、创建智能合约等等!
以下文档将指导您安装和运行 web3.js[3],并提供带有示例的 API 参考文档。
使用以太坊开发区块链应用程序有几个不同的方面:
- • 智能合约开发——使用 Solidity 编程语言编写部署到区块链的代码。
- • 开发与区块链交互的网站或客户端——编写代码,通过智能合约从区块链读取和写入数据。
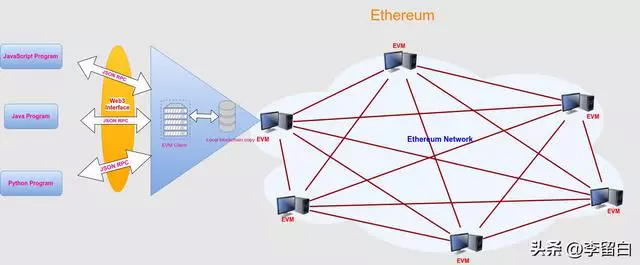
如果您有 Web 开发背景,您可能已经使用 jQuery 对 Web 服务器进行 Ajax 调用。这是理解web3.js功能的一个很好的起点。您可以使用web3.js来读取和写入以太坊区块链,而不是使用 jQuery 从 Web 服务器读取和写入数据。
下图说明了web3.js如何与以太坊区块链交互:
Web3.js 与 ethers.js
web3.js和ethers.js都是以太坊 JavaScript 库。
Ether.js由加拿大开发人员 Rick Moore 开发和维护。
Web3.js由以太坊基金会开发和维护。因此,对web3.js有更广泛的支持,因为有更多的开发人员支持它。
ethers.js和web3.js之间的一个主要区别是它们如何处理密钥管理以及与以太坊区块链的交互。
Web3.js假设有一个本地节点连接到应用程序。假设节点存储密钥、签署交易、读取以太坊区块链并与之交互。实际上,这种情况并不常见——大多数用户并没有在本地运行geth 。[5]Metamask 通过浏览器应用程序有效地模拟了该环境,因此大多数 web3 应用程序都需要 Metamask 来保存密钥、签署交易并与以太坊主[6]网交互。
另一方面,**ethers.js[7]采用了一种不同的方法,我们认为这为开发人员提供了更大的灵活性。Ethers.js**将“节点”分成两个不同的角色:
- • 一个保存密钥和签署交易的“钱包”,以及
- • 充当与以太坊网络的匿名连接、检查状态和发送交易的“提供者”。
想到的ethers.js的两个主要优点是:
- 1. ENS 名字是一等公民。
- 2. 密钥管理和状态 - 关注点分离。
要在web3.js中运行 Javascript 代码,您需要将web3.js放入您的项目中。这可以使用以下方法完成:
依赖项
有一些依赖项可以帮助您开始使用web3.js进行开发。
节点包管理器 (NPM)
我们需要的第一个依赖项是Node.js 附带的Node Package Manager或 NPM。[8]要检查您是否已经安装了 Node,请转到您的终端并输入:
node -vWeb3.js 库
您可以在终端中使用 NPM 安装 Web3.js 库,如下所示:
npm install web3
或使用yarn:
yarn add web3Infura rpc URL
要在主网上使用 JSON RPC 连接到以太坊节点,我们需要访问以太坊节点。有几种方法可以做到这一点。
你可以做到这一点的一种方法是使用Geth[9]或Parity 运行你自己的以太坊节点。[10]但这需要你从区块链下载大量数据并保持同步。如果您以前从未尝试过这样做,这将是一个巨大的头痛。
主要是为了方便,您可以使用Infura[11]访问以太坊节点,而无需自己运行。Infura 是一项免费提供远程以太坊节点的服务。您需要做的就是注册,并为您想要连接的网络获取 API 密钥和 RPC URL。注册后,您的 Infura RPC URL 应如下所示:
https://mainnet.infura.io/YOUR_INFURA_API_KEYweb3.js 是做什么用的?
Web3.js可用于前端和后端检查账户余额、从区块链读取数据、进行交易,甚至部署智能合约。
1. 使用 web3.js 查看账户余额
现在您的所有依赖项都已安装,让我们来看看如何使用 web3.js 检查您的帐户余额。首先,您应该像这样在终端中启动 Node 控制台:
node
现在您已经打开了 Node 控制台!在 Node 控制台中,您可以像这样要求 web3.js:
const Web3 = require(’web3’);
现在,您可以访问一个变量,您可以在其中创建一个新的 web3 连接。在我们生成 web3 连接之前,我们必须首先将 Infura URL 分配给一个变量,如下所示:
const rpcURL = "https://mainnet.infura.io/YOUR_INFURA_API_KEY";
确保将YOUR_INFURA_API_KEY“替换为您之前获得的实际 Infura API 密钥。现在您可以像这样实例化 Web3 连接:
const web3 = new Web3(rpcURL);
现在,你有一个实时的 web3 连接,可以让你与以太坊主网对话。让我们使用这个连接来检查这个账户的账户余额:0x105cb19ba40384a8f2985816DA7883b076969cA7。我们可以通过web3.eth.getBalance()查看其余额来查看该帐户持有多少以太币。
第一步,让我们将地址分配给一个变量:
const address = "0x105cb19ba40384a8f2985816DA7883b076969cA7";
现在让我们像这样检查帐户余额:
web3.eth.getBalance(address, (err, wei) => {balance = web3.utils.fromWei(wei, ’ether’)
就是这样!这就是您使用web3.js检查帐户余额的方式。
以下是我们在本教程中编写的代码的摘要:
const Web3 = require(’web3’)const rpcURL = ’’ // Your RPC URL goes hereconst web3 = new Web3(rpcURL)const address = ’’ // Your account address goes hereweb3.eth.getBalance(address, (err, wei) => {balance = web3.utils.fromWei(wei, ’ether’)
首先,我们通过调用web3.eth.getBalance()来检查余额,它接受一个带有两个参数的回调函数,error和balance自身。我们现在将忽略该error参数,并使用该wei参数引用余额。以太坊以 wei 表示余额,这是 ether 的最小细分,有点像一分钱。我们可以用web3.utils.fromWei(wei, ’ether’); 将这个余额转换为以太币。
2.用web3.js从智能合约中读取数据
在本节中,我们将简要学习如何从以太坊区块链中读取智能合约数据。
为了使用 web3.js 从智能合约中读取数据,我们需要两件事:
- 1. 我们想要与之交互的智能合约的 JavaScript 表示。
- 2. 读取数据时调用智能合约上的函数的一种方式。
我们可以通过web3.eth.Contract()函数获得以太坊智能合约的 JavaScript 表示。
该函数需要两个参数:一个用于智能合约 ABI,一个用于智能合约地址。
智能合约 ABI 代表“抽象二进制接口”,它是一个 JSON 数组,描述了特定智能合约的工作方式。
下面是一个 ABI 示例:
const abi = [{"constant":true,"inputs":[],"name":"mintingFinished","outputs":[{"name":"","type":"bool"}],"payable":false,"type":"Function"},{"constant":true,"inputs":[],"name":"name","outputs":[{"name":"","type":"string"}],"payable":false,"type":"function"},{"constant":false,"inputs":[{"name":"_spender","type":"address"},{"name":"_value","type":"uint256"}],"name":"approve","outputs":[],"payable":false,"type":"function"},{"constant":true,"inputs":[],"name":"totalSupply","outputs":[{"name":"","type":"uint256"}],"payable":false,"type":"function"},{"constant":false,"inputs":[{"name":"_from","type":"address"},{"name":"_to","type":"address"},{"name":"_value","type":"uint256"}],"name":"transferFrom","outputs":[],"payable":false,"type":"function"},{"constant":true,"inputs":[],"name":"decimals","outputs":[{"name":"","type":"uint256"}],"payable":false,"type":"function"},{"constant":false,"inputs":[],"name":"unpause","outputs":[{"name":"","type":"bool"}],"payable":false,"type":"function"},{"constant":false,"inputs":[{"name":"_to","type":"address"},{"name":"_amount","type":"uint256"}],"name":"mint","outputs":[{"name":"","type":"bool"}],"payable":false,"type":"function"},{"constant":true,"inputs":[],"name":"paused","outputs":[{"name":"","type":"bool"}],"payable":false,"type":"function"},{"constant":true,"inputs":[{"name":"_owner","type":"address"}],"name":"balanceOf","outputs":[{"name":"balance","type":"uint256"}],"payable":false,"type":"function"},{"constant":false,"inputs":[],"name":"finishMinting","outputs":[{"name":"","type":"bool"}],"payable":false,"type":"function"},{"constant":false,"inputs":[],"name":"pause","outputs":[{"name":"","type":"bool"}],"payable":false,"type":"function"},{"constant":true,"inputs":[],"name":"owner","outputs":[{"name":"","type":"address"}],"payable":false,"type":"function"},{"constant":true,"inputs":[],"name":"symbol","outputs":[{"name":"","type":"string"}],"payable":false,"type":"function"},{"constant":false,"inputs":[{"name":"_to","type":"address"},{"name":"_value","type":"uint256"}],"name":"transfer","outputs":[],"payable":false,"type":"function"},{"constant":false,"inputs":[{"name":"_to","type":"address"},{"name":"_amount","type":"uint256"},{"name":"_releaseTime","type":"uint256"}],"name":"mintTimelocked","outputs":[{"name":"","type":"address"}],"payable":false,"type":"function"},{"constant":true,"inputs":[{"name":"_owner","type":"address"},{"name":"_spender","type":"address"}],"name":"allowance","outputs":[{"name":"remaining","type":"uint256"}],"payable":false,"type":"function"},{"constant":false,"inputs":[{"name":"newOwner","type":"address"}],"name":"transferOwnership","outputs":[],"payable":false,"type":"function"},{"anonymous":false,"inputs":[{"indexed":true,"name":"to","type":"address"},{"indexed":false,"name":"value","type":"uint256"}],"name":"Mint","type":"event"},{"anonymous":false,"inputs":[],"name":"MintFinished","type":"event"},{"anonymous":false,"inputs":[],"name":"Pause","type":"event"},{"anonymous":false,"inputs":[],"name":"Unpause","type":"event"},{"anonymous":false,"inputs":[{"indexed":true,"name":"owner","type":"address"},{"indexed":true,"name":"spender","type":"address"},{"indexed":false,"name":"value","type":"uint256"}],"name":"Approval","type":"event"},{"anonymous":false,"inputs":[{"indexed":true,"name":"from","type":"address"},{"indexed":true,"name":"to","type":"address"},{"indexed":false,"name":"value","type":"uint256"}],"name":"Transfer","type":"event"}]
我知道这似乎是一个非常长的、完整的阵列。如果它看起来有压迫性,请不要担心。这个例子是 OmiseGo 代币的 ABI,它实现了 ERC-20 代币标准。您可以在Etherscan[12]上找到有关此令牌的更多详细信息,包括其 ABI 和地址。我们将在其余示例中使用此智能合约 ABI。
当我们在这里时,我将继续从以太坊主网将地址存储到 OMG 令牌:
const address = "0xd26114cd6EE289AccF82350c8d8487fedB8A0C07";
现在我们已经分配了这两个值,我们可以像这样创建 OMG 代币智能合约的完整 JavaScript 表示:
const contract = new web3.eth.Contract(abi, address);
现在本文的第一部分已经完成,我们需要完成第二部分:通过调用其函数从智能合约中读取数据。所有智能合约功能都列在contract.methods分配的 Web3 合约的命名空间下。例如,contract.methods.myFunction()如果合约实现了,我们可以调用myFunction().
伟大的!所以理论上我们可以调用智能合约实现的任何功能。但是我们怎么知道它实现了哪些功能呢?一方面,我们可以打印contract.methods到控制台,看看返回了什么。然而,由于这个智能合约实现了 ERC-20 标准,我们知道它实现了几个功能,如totalSupply()、name()、symbol()和balanceOf()。我们可以单独读取每个值,如下所示:
首先,现有的所有 OMG 代币的总供应量:
contract.methods.totalSupply().call((err, result) => { console.log(result) });// > 140245398
二、OMG代币名称:
contract.methods.name().call((err, result) => { console.log(result) });// > OMG Token
最后,我们可以检查给定帐户的余额。我在 Etherscan 上寻找了一个 OMG 持有者,并找到了这个地址“ 0xd26114cd6EE289AccF82350c8d8487fedB8A0C07”。
我们可以像这样检查这个帐户的余额:
contract.methods.balanceOf(’0xd26114cd6EE289AccF82350c8d8487fedB8A0C07’).call((err, result) => { console.log(result) });// > Some large number...
就是这样!这就是您使用web3.js从智能合约中读取数据的方式。
以下是本节所有代码的摘要:
const Web3 = require(’web3’);const rpcURL = ’’ // Your RCP URL goes here const web3 = new Web3(rpcURL)const web3 = new Web3(rpcURL);const abi = [{"constant":true,"inputs":[],"name":"mintingFinished","outputs":[{"name":"","type":"bool"}],"payable":false,"type":"function"},{"constant":true,"inputs":[],"name":"name","outputs":[{"name":"","type":"string"}],"payable":false,"type":"function"},{"constant":false,"inputs":[{"name":"_spender","type":"address"},{"name":"_value","type":"uint256"}],"name":"approve","outputs":[],"payable":false,"type":"function"},{"constant":true,"inputs":[],"name":"totalSupply","outputs":[{"name":"","type":"uint256"}],"payable":false,"type":"function"},{"constant":false,"inputs":[{"name":"_from","type":"address"},{"name":"_to","type":"address"},{"name":"_value","type":"uint256"}],"name":"transferFrom","outputs":[],"payable":false,"type":"function"},{"constant":true,"inputs":[],"name":"decimals","outputs":[{"name":"","type":"uint256"}],"payable":false,"type":"function"},{"constant":false,"inputs":[],"name":"unpause","outputs":[{"name":"","type":"bool"}],"payable":false,"type":"function"},{"constant":false,"inputs":[{"name":"_to","type":"address"},{"name":"_amount","type":"uint256"}],"name":"mint","outputs":[{"name":"","type":"bool"}],"payable":false,"type":"function"},{"constant":true,"inputs":[],"name":"paused","outputs":[{"name":"","type":"bool"}],"payable":false,"type":"function"},{"constant":true,"inputs":[{"name":"_owner","type":"address"}],"name":"balanceOf","outputs":[{"name":"balance","type":"uint256"}],"payable":false,"type":"function"},{"constant":false,"inputs":[],"name":"finishMinting","outputs":[{"name":"","type":"bool"}],"payable":false,"type":"function"},{"constant":false,"inputs":[],"name":"pause","outputs":[{"name":"","type":"bool"}],"payable":false,"type":"function"},{"constant":true,"inputs":[],"name":"owner","outputs":[{"name":"","type":"address"}],"payable":false,"type":"function"},{"constant":true,"inputs":[],"name":"symbol","outputs":[{"name":"","type":"string"}],"payable":false,"type":"function"},{"constant":false,"inputs":[{"name":"_to","type":"address"},{"name":"_value","type":"uint256"}],"name":"transfer","outputs":[],"payable":false,"type":"function"},{"constant":false,"inputs":[{"name":"_to","type":"address"},{"name":"_amount","type":"uint256"},{"name":"_releaseTime","type":"uint256"}],"name":"mintTimelocked","outputs":[{"name":"","type":"address"}],"payable":false,"type":"function"},{"constant":true,"inputs":[{"name":"_owner","type":"address"},{"name":"_spender","type":"address"}],"name":"allowance","outputs":[{"name":"remaining","type":"uint256"}],"payable":false,"type":"function"},{"constant":false,"inputs":[{"name":"newOwner","type":"address"}],"name":"transferOwnership","outputs":[],"payable":false,"type":"function"},{"anonymous":false,"inputs":[{"indexed":true,"name":"to","type":"address"},{"indexed":false,"name":"value","type":"uint256"}],"name":"Mint","type":"event"},{"anonymous":false,"inputs":[],"name":"MintFinished","type":"event"},{"anonymous":false,"inputs":[],"name":"Pause","type":"event"},{"anonymous":false,"inputs":[],"name":"Unpause","type":"event"},{"anonymous":false,"inputs":[{"indexed":true,"name":"owner","type":"address"},{"indexed":true,"name":"spender","type":"address"},{"indexed":false,"name":"value","type":"uint256"}],"name":"Approval","type":"event"},{"anonymous":false,"inputs":[{"indexed":true,"name":"from","type":"address"},{"indexed":true,"name":"to","type":"address"},{"indexed":false,"name":"value","type":"uint256"}],"name":"Transfer","type":"event"}]const address = ’0xd26114cd6EE289AccF82350c8d8487fedB8A0C07’ ;const contract = new web3.eth.Contract(abi, address);contract.methods.totalSupply().call((err, result) => { console.log(result) });contract.methods.name().call((err, result) => { console.log(result) });contract.methods.symbol().call((err, result) => { console.log(result) });contract.methods.balanceOf(’0xd26114cd6EE289AccF82350c8d8487fedB8A0C07’).call((err, result) =>{ console.log(result) }); // > Some large number...3. 使用 web3.js 创建以太坊交易
本节将向您展示如何使用web3.js在以太坊区块链上创建交易。您将看到创建以太坊交易时会发生什么,以及如何使用web3.js将交易手动广播到网络。
除了学习web3.js 之外,本文的目的是帮助您了解交易在以太坊区块链上的基本原理。每当您创建交易时,您就是在将数据写入区块链并更新其状态。有几种方法可以做到这一点,比如将以太币从一个账户发送到另一个账户,调用写入数据的智能合约函数,以及将智能合约部署到区块链。通过使用 web3.js 库执行这些操作并观察每个步骤的工作方式,我们可以更好地理解这些概念。
为了向网络广播交易,我们需要先对它们进行签名。我将使用一个名为ethereumjs-tx[13]的附加 JavaScript 库来执行此操作。您可以像这样从命令行安装此依赖项:
npm install ethereumjs-tx
我们要使用这个库的原因是我们想在本地签署所有交易。如果我们在本地运行自己的以太坊节点,我们可以解锁本地存储的帐户并在本地签署我们的所有交易。如果是这样的话,我们不一定需要使用这个库。但是,在本教程中,我们使用的是 Infura 托管的远程节点。虽然 Infura 是一项值得信赖的服务,但我们仍然希望在本地签署交易,而不是让远程节点管理我们的私钥。
这正是我们将在本文中所做的。我们将创建原始交易,对其进行签名,然后发送交易并将其广播到网络。
让我们首先创建一个简单的index.js文件来运行本课中的代码,而不是在控制台中执行所有操作。
在index.js文件中,我们首先需要新安装的库,如下所示:
const Tx = require(’ethereumjs-tx’)
接下来,我们将设置一个 web3 连接,就像我们在上一节中所做的那样:
const Web3 = require(’web3’)const web3 = new Web3(’https://ropsten.infura.io/YOUR_INFURA_API_KEY’)
请注意,我们使用的是 Ropsten 测试网络,这与我们在上一节中使用的以太坊主网不同。我们将使用测试网络,因为所有交易都以以太币的形式消耗气体。我们可以在 Ropsten 测试网上使用假以太币,而不用担心花钱。您可以从Ropsten 测试网络[14]上的水龙头或Metamask 水龙头[15]获得假以太币。
我们将创建一个交易,将假以太币从一个账户发送到另一个账户。为此,我们需要两个帐户及其私钥。
您实际上可以像这样使用 web3.js 创建新帐户:
web3.eth.accounts.create()// address: "0xb8CE9ab6943e0eCED004cDe8e3bBed6568B2Fa01",// privateKey: "0x348ce564d427a3311b6536bbcff9390d69395b06ed6c486954e971d960fe8709",// signTransaction: function(tx){...},// sign: function(data){...},// encrypt: function(password){...}
创建这两个帐户后,请确保使用水龙头中的假以太币加载它们。现在,我们将他们的公钥分配给我们脚本中的变量,如下所示:
const account1 = ’0xb8CE9ab6943e0eCED004cDe8e3bBed6568B2Fa01’;const account2 = ’0xb8CE9ab6943e0eCED004cDe8e3bBed6568B2Fa02’;
注意:请务必使用您生成的帐户,因为这些帐户不适用于本课程。现在,让我们将私钥保存到环境中,如下所示:
const privateKey1 = Buffer.from(process.env.PRIVATE_KEY_1);const privateKey1 = Buffer.from(process.env.PRIVATE_KEY_2);
我们现在已经设置了所有变量。我知道在这一点上,其中一些可能有点令人困惑。坚持我,这一切很快就会变得有意义。
从这一点来说,我们想做几件事:
- 1. 构建交易对象。
- 2. 签署交易。
- 3. 将交易广播到网络。
我们可以像这样构建事务对象:
const txObject = {nonce: web3.utils.toHex(txCount),to: account2,value: web3.utils.toHex(web3.utils.toWei(’0.1’, ’ether’)),gasLimit: web3.utils.toHex(21000),gasPrice: web3.utils.toHex(web3.utils.toWei(’10’, ’gwei’))
在此代码中,我们正在构建一个对象,该对象具有生成事务所需的所有值,例如nonce、to、value、gasLimit和gasPrice。
让我们分解每个值:
- • nonce- 这是给定帐户的先前交易计数。我们将立即分配此变量的值。我们还必须将此值转换为十六进制。我们可以使用 web3.js 实用程序来做到这一点web3.utils.toHex()。
- • to- 我们发送以太币的账户。
- • value- 我们要发送的以太币数量。此值必须以 wei 表示并转换为十六进制。我们可以使用 web3.js 实用程序将值转换为 wei web3.utils.toWei()。
- • gasLimit- 这是交易消耗的最大气体量。像这样的基本交易总是需要 21000 单位的 gas,所以我们将在这里使用它来计算价值。
- • gasPrice- 这是我们要为每单位 gas 支付的金额。我将在这里使用 10 Gwei。
请注意,此交易对象中没有表单字段。每当我们使用account1的私钥签署此交易时,就会推断出这一点。
现在让我们为 nonce 变量赋值。我们可以通过web3.eth.getTransactionCount()函数获取交易nonce。我们将把所有代码包装在一个回调函数中,如下所示:
web3.eth.getTransactionCount(account1, (err, txCount) => {const txObject = {nonce: web3.utils.toHex(txCount),to: account2,value: web3.utils.toHex(web3.utils.toWei(’0.1’, ’ether’)),gasLimit: web3.utils.toHex(21000),gasPrice: web3.utils.toHex(web3.utils.toWei(’10’, ’gwei’))
像这样,我们已经完成了事务对象的构建!现在我们要进行sign交易了。我们可以这样做:
const tx = new Tx(txObject)tx.sign(privateKey1)const serializedTx = tx.serialize()const raw = ’0x’ + serializedTx.toString(’hex’)
这里我们使用etheremjs-tx库创建了一个新的“ Tx object”。我们也使用这个库来用“privateKey1”签署交易。接下来,我们将事务序列化并将其转换为十六进制字符串,以便可以将其传递给 web3。最后,我们将这个签名的序列化交易发送到测试网络,web3.eth.sendSignedTransaction()函数如下:
web3.eth.sendSignedTransaction(raw, (err, txHash) => {console.log(’txHash:’, txHash)
这是本课的最后一步,发送交易并将其广播到网络。此时,您完成的index.js文件应如下所示:
var Tx = require(’ethereumjs-tx’)const Web3 = require(’web3’)const web3 = new Web3(’https://ropsten.infura.io/YOUR_INFURA_API_KEY’)const account1 = ’’ // Your account address 1const account2 = ’’ // Your account address 2const privateKey1 = Buffer.from(’YOUR_PRIVATE_KEY_1’, ’hex’)const privateKey2 = Buffer.from(’YOUR_PRIVATE_KEY_2’, ’hex’)web3.eth.getTransactionCount(account1, (err, txCount) => {// Build the transactionconst txObject = {nonce: web3.utils.toHex(txCount),to: account2,value: web3.utils.toHex(web3.utils.toWei(’0.1’, ’ether’)),gasLimit: web3.utils.toHex(21000),gasPrice: web3.utils.toHex(web3.utils.toWei(’10’, ’gwei’))// Sign the transactionconst tx = new Tx(txObject)tx.sign(privateKey1)const serializedTx = tx.serialize()const raw = ’0x’ + serializedTx.toString(’hex’)// Broadcast the transactionweb3.eth.sendSignedTransaction(raw, (err, txHash) => {console.log(’txHash:’, txHash)// Now go check etherscan to see the transaction!
然后,您可以使用 NodeJS 从终端运行该index.js文件,如下所示:
node index.js
或者简单地运行:
node indexWeb3.js 实用程序
关于 web3.js,有一些你可能不知道的很酷的提示和技巧。让我们继续设置index.js并开始看看这些技巧。让我们像这样连接到以太坊主网:
const Web3 = require(’web3’)const web3 = new Web3(’https://mainnet.infura.io/YOUR_INFURA_API_KEY’)
首先,您实际上可以获得网络当前的平均汽油价格,如下所示:
web3.eth.getGasPrice().then((result) => {console.log(web3.utils.fromWei(result, ’ether’)
假设您以前在区块链上进行过开发,您可能已经处理过散列函数。Web3.js 有很多用于使用散列函数的内置助手。
您可以像这样直接访问该sha3函数:
console.log(web3.utils.sha3(’Hashnode blog’));
或keccack256:
console.log(web3.utils.keccak256(’Hashnode blog’));
您还可以通过生成 32 字节随机十六进制来处理(伪)随机性,如下所示:
console.log(web3.utils.randomHex(32));
无论如何,您是否曾经发现自己试图对 JavaScript 数组或对象执行操作,并且需要外部库的帮助?值得庆幸的是,web3.js 附带 underscoreJS 库:
const _ = web3.utils.__.each({ key1: ’value1’, key2: ’value2’ }, (value, key) => {console.log(key)
就是这样!这些是您可以与web3.js 一起使用的一些花哨的提示和技巧。这是本课的完整教程代码:
const Web3 = require(’web3’)const web3 = new Web3(’https://mainnet.infura.io/YOUR_INFURA_API_KEY’)// Get average gas price in wei from last few blocks median gas priceweb3.eth.getGasPrice().then((result) => {console.log(web3.utils.fromWei(result, ’ether’)// Use sha256 Hashing functionconsole.log(web3.utils.sha3(’Hashnode blog’))// Use keccak256 Hashing function (alias)console.log(web3.utils.keccak256(’Dapp University’))// Get a Random Hexconsole.log(web3.utils.randomHex(32))// Get access to the underscore JS libraryconst _ = web3.utils.__.each({ key1: ’value1’, key2: ’value2’ }, (value, key) => {console.log(key)
现在您可以使用 NodeJS 从终端运行index.js文件,如下所示:
node index.js
或者简单地运行:
node index结论
在本文中,我们了解了 web3.js 库的全部内容。我们介绍了web3.js和ethers.js,它们的区别以及它们的用途。
我们还学习了如何使用web3.js检查账户余额、从智能合约中读取数据,以及如何使用web3.js创建以太坊交易。
我们还简要了解了一些web3.js提示和技巧。
引用链接
[1] 智能合约: https://web3.hashnode.com/glossary/what-are-smart-contracts
[2] Web3.js: https://web3js.readthedocs.io/en/v1.5.2/index.html
[3] 安装和运行 web3.js: https://web3js.readthedocs.io/en/v1.5.2/getting-started.html#adding-web3
[4] iotbl: https://iotbl.blogspot.com/2017/03/ethereum-and-blockchain-2.html
[5] geth 。: https://geth.ethereum.org/
[6] 坊主: https://web3.hashnode.com/glossary/what-is-mainnet
[7] ethers.js: https://docs.ethers.io/v5/
[8] Node Package Manager或 NPM。: https://nodejs.org/en/
[9] Geth: https://github.com/ethereum/go-ethereum/wiki/geth
[10] Parity 运行你自己的以太坊节点。: https://www.parity.io/
[11] Infura: https://infura.io/
[12] 您可以在Etherscan: https://etherscan.io/address/0xd26114cd6EE289AccF82350c8d8487fedB8A0C07
[13] ethereumjs-tx: https://github.com/ethereumjs/ethereumjs-tx
[14] 您可以从Ropsten 测试网络: http://faucet.ropsten.be:3001/
[15] Metamask 水龙头: https://faucet.metamask.io/
马上咨询: 如果您有业务方面的问题或者需求,欢迎您咨询!我们带来的不仅仅是技术,还有行业经验积累。
QQ: 39764417/308460098 Phone: 13 9800 1 9844 / 135 6887 9550 联系人:石先生/雷先生